Showing posts with label physics. Show all posts

Friday, December 14, 2012

Flying Hovercraft

Flying Hovercraft

★Friction is the force that stops/prevents an object from moving on forever. In this experiment, we will find out how the hovercraft works with and without friction.
★Time: 15 minutes (including setup and clean up)


★Cost: $2


★Area of Science and Topic:Physics


★Learning Objectives: Students will be able to learn how objects move differently when either there is friction or no friction. They would also get to know more about friction.


★Materials:
1. CD
2. bottle
3. balloon
4. scissors or cutter knife
5. glue gun

★Procedure:
1. First, get all materials needed.
2. With the scissors, cut the top part of the bottle.
3. Glue the part of the bottle to the center of the CD with a glue gun like this:


4. When the glue is dry, pull the balloon over the bottle top like this:


5. Through the hole at the bottom of the CD, blow the balloon.
6. Try sliding the hovercraft on a smooth surface. Observe what happens.


★How does this experiment work?
When the balloon is blown, the air comes out through the hole at the bottom of the CD. The air pushes the ground, which makes the hovercraft float. When it floats, there is no contact between the ground and the CD, thus there is no friction. When friction is not present, an object moves faster and smoother. As the air from the balloon is slowly used up the CD would also slowly land on the ground, making friction present. Eventually, the hovercraft would stop at rest.
Watch this video below and compare the movement of the CD with the balloon and the CD without the balloon. How is the presence of air(balloon) related to the presence of friction in this experiment?

★Tips for making the experiment work best with kids: 
Ask an adult for help when using the glue gun.
So that the kids could have some fun, let them blow the balloon.

Saturday, August 11, 2012

Let's make a Vuvuzela

★Do you remember the noise to cheer soccer teams in the WorldCup in South Africa? If you don't let's remake the noise making instrument!

★Time : about 20 minutes (including setup and cleanup)

★Cost $: suppose to be $0, if every materials are in the home. (maybe you only have to buy insulationg rubber tape, and a balloon. about $1~2)

★Area of Science and Topic: General Science / Physics

★Learning objectives (what kids should learn as a result of performing this experiment): Students will learn how vibration can make sounds.

★Materials:
*A plastic cup (better if transparent)
*A long and thick paper roll (should be longer than the cup and strong enough endure the pressure of the stretched balloon, and it is easily found with cooking foils.)
*Insulating rubber tape (to make the inner side of side of the cup vacuum)
*A cutter and a pair of scissors (to make a whole and to cut)
 *A balloon


★Procedure:
1. Make a hole on the bottom of the plastic cup. It should be as big as the size of the paper role.
2. Make one more hole on the upper part of the cup. This time the hole should be small. It should be small enough to be covered by mouth of anyone.
3. Put the paper role into the hole of the plastic cup. The paper role should be extended a little bit to out side of the mouth of the cup.
4. Make the paper role be fixed in the cup, and seal it with rubber tape. It should have no space of air to come out.
5. Stretch the balloon, and cut little of the narrow part. Stretch it again, and reach it on the mouth part of the cup.
6. Seal it with the rubber tape again. Make sure it is fully sealed and there is no air coming out of that part.
7. Finally, blow through the small hole on the upper part of the cup. It should make sounds.


★Tips for making the experiment work best with kids:
 - Sealing might be difficult for the kids, but sealing will decide a great role, if  the experiment is a successful experience, or it is not.

★Online resources for this experiment: Videos (links) Pictures (links) Websites (links)
http://blog.naver.com/chemijhy?Redirect=Log&logNo=100125945245
http://todaudrhkwkd.blog.me/140160435175


★How does this work?
When you blow into the small hole, there will be no way for the air to go out, thus the balloon increases as the air pressure increases. The air vibrates, and the balloon will also vibrate as the air is blown. The vibrating air passes through paper role, creates normal wave, and it makes sounds.

Wednesday, February 15, 2012

Let's Make a Parachute!

★We are going to make a small parachute and watch what happens when you drop it.


★Time: takes around 10-15minutes

★Cost: $0 (if you have a piece of plastic bag and pieces of string)

★Materials:

1. A plastic bag

2. Scissors

3. String

4. A small piece that you can weigh

★Area of Topic: Physics

★Learning Objectives:

  Students can learn about air resistance.

★ Procedure

1. Cut out a large square from your plastic bag or material

2. Trim the edges so it looks like an octagon (an eight sided shape)

3. Cut a small whole near the edge of each side.

4. Attach 8pieces of string of the same length to each of the holes.

5. Tie the pieces of string to the object you are using as a weight.

6. Use a chair or find a high spot to drop your parachute and test how well it worked, remember that you want it to drop as slow as possible. :).

7. Compare the speeds of droppinf of plain thing and the thing with parachute.

★ Tips for making the experiment work best with kids:

1. Make sure that the piece of plastic bag is not torn.

2. Do not let the kids use the scissors in case of an accident

★Explanation:
The item with parachute will fall slower than the item dropped only. It is because of air resistance. As the surface gets bigger, the air resistance it gets get bigger. Since you expanded the surface area of the item with the parachute, the parachute will drop slower than the plain item.

★ Online resources for this experiment

http://pbskids.org/rogers/R_house/object3.htm
http://www.sciencekids.co.nz/experiments.html


Saturday, January 14, 2012

Pin Hole Camera

      
                                               ★Pin Hole Camera★ 

* This experiment is used to teach about optics in physics. Through Pin Hole Camera, kids can learn the concept of the function of the eyes (upside down effect due to light that passes through a small hole).
                          

★ Time: about 10 minutes (including setup and cleanup)

★ Cost: $ 0.00            (if all the materials are provided)

               $ 0.20            a piece of dark paper (best color black)
               $ 0.50            scotch tape

             * options for container
               $ 1.75            a pringles container
               $ 0.20            a piece of dark paper
               $ 0.00 (free)  a container found from garbage

             * options for a translucent cover
              $ 2.50            a roll of wax paper (but only a piece is needed)
              $ 0.00            a cover of pringles (comes with pringles)
              $ 0.00            a translucent cover found from garbage

             Total Cost: about $ 0.70 - $ 3.20
         ★ Area of Science and Topic: Physics (with Biology application)

★ Learning objectives: Students will understand the path of light.
                                          Studens will understand how eyes perceive things.


★ Materials:  


                        1 piece of dark paper (best color black)
                        1 pringles container
                        1 cover of pringles
                        1 sharp object such as screw driver (to put a hole)
                        1 scotch tape

★ Procedure:
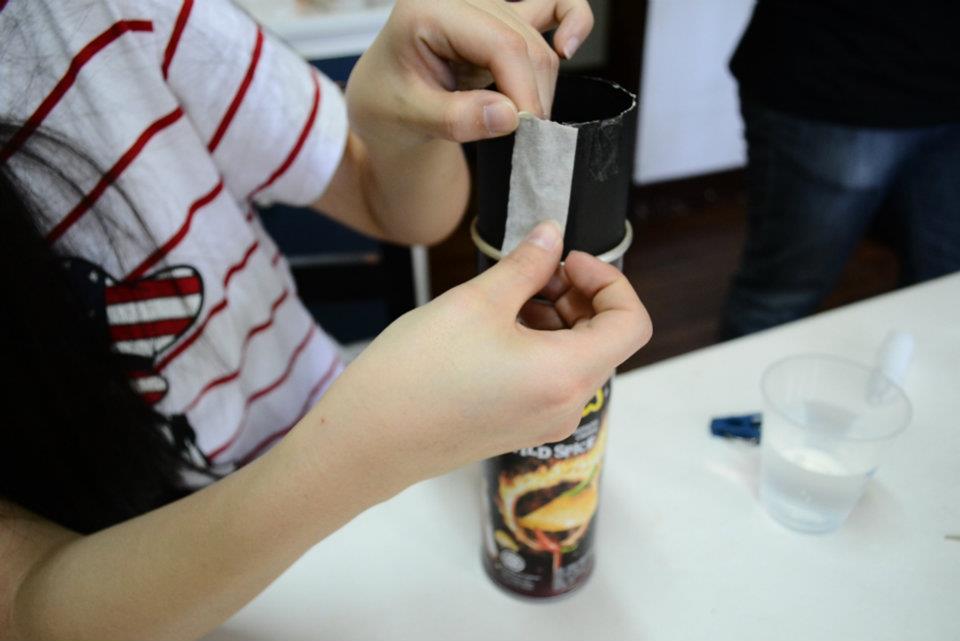
Figure 1. Roll the black piece of paper into a cylinder shape
                       Then, use scotch tape to make it into a cylinder (shape)


Figure 2. Result of the procedure done in Figure 1


Figure 3. Put the small piece of translucent cover on the 
         cylinder shape thing (product in Figure 2)


Figure 4. Result of Figure 3


Figure 5. Make a small hole on the bottom of 
                  Pringles container with a sharp object


Figure 6. Put the product (Figure 4) inside the Pringles container
                      (the translucent cover facing or placed inside the container)


* Moving the black cylinder shaped thing (pulling out and in), observe an object placed under           the sun. A strong light such as sunlight is needed in this experiment to observe upside-down view of the object.

*Some good options for the object to be observed:   curtain (when the sun hits the curtain)
                                                                            candle


★ Tips for making the experiment work best with kids:
             a) Do not push the camera when someone is looking through it.
             b) Let the kids finish the snack before using it for the experiment.
             c) Wash the can of Pringles before using it for the experiment.